Make House Plans in SketchUp: A Comprehensive Guide for Beginners
SketchUp is a versatile 3D modeling software that can be used for a wide range of projects, including creating house plans. In this article, we will provide a comprehensive guide on how to make house plans in SketchUp, covering essential aspects like setup, drawing tools, and layout.
Setting Up SketchUp
Before you start designing, it's important to set up SketchUp properly. Choose the correct template based on your project requirements and adjust the units and dimensions to match your desired scale.
Understanding Drawing Tools
SketchUp provides various drawing tools for creating house plans. These include the Line Tool for drawing walls, the Rectangle Tool for creating rooms, and the Circle Tool for curved elements. Familiarize yourself with these tools and their options.
Creating the Floor Plan
Start by creating the outline of your house using the Rectangle Tool. Divide the space into different rooms using walls and partitions. Use the Measure Tool to ensure accurate dimensions.
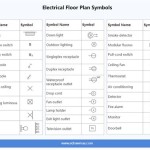
Adding Windows and Doors
Windows and doors are crucial elements of a house plan. Use the Rectangle Tool to draw the openings and the Push/Pull Tool to create the extrusions. Add handles and windowpanes to complete the details.
Defining Levels
If your house has multiple levels, you need to create separate plans for each floor. Use the Copy and Paste commands to duplicate the floor plan and adjust the height using the Move Tool.
Adding Roof and Exterior Features
Once the floor plans are complete, create the roof by drawing a polygon and using the Follow Me Tool to extrude it. Add chimneys, gutters, and other exterior features to enhance the design.
Creating Sections and Elevations
Sections and elevations are important for understanding the 3D structure of your house. Use the Section Plane Tool to create vertical sections and the Camera Tool to generate elevations (front, side, and rear views).
Annotating and Detailing
Add dimensions, notes, and other annotations to your plans using the Text Tool and Dimension Tool. You can also import images or create custom details to enhance the clarity of your drawings.
Exporting Your Plans
When your house plans are complete, you can export them in various formats. SketchUp supports common file types like DWG, DXF, and PDF, which can be used for sharing or professional printing.
Conclusion
Making house plans in SketchUp is a rewarding experience that empowers you to visualize and design your dream home. By following the steps outlined in this guide, you can create accurate and detailed plans that will help you bring your vision to life.

Layout Floor Plan Pro Sketchup Community

Creating Floorplans Can This Not Be Done More Organically In Sketchup Pro Community

Sketchup Floor Plan Tutorial For Beginners

2d Floor Plans Without Drawing The 3d Object Pro Sketchup Community

Layout Floor Plan Pro Sketchup Community

Making Unique Floor Plans Skill Builder

Sketchup Tutorial How To Create A Quick Floor Plan

How To Create A Floor Plan With Sketchup Easy Steps

Free Floor Plan Sketchup Review Micro House Plans Drawing

Plan View 2d Sketchup For Web Community