Outdoor Wooden Dog House Plans: Creating a Cozy Haven for Your Canine Companion
Providing a comfortable and safe shelter for your beloved dog is essential, especially during inclement weather. An outdoor wooden dog house offers a haven for your furry friend, protecting them from the elements and providing a private space to rest and relax. Crafting a custom dog house allows you to tailor the design to your dog's specific needs and preferences, ensuring a comfortable and aesthetically pleasing addition to your yard. This article will explore essential considerations for building a sturdy and inviting wooden dog house for your canine companion.
Choosing the Right Wood for Your Dog House
Selecting the appropriate wood is crucial for building a durable and weather-resistant dog house. Several wood types are suitable for outdoor structures; however, certain factors should be considered to ensure longevity and safety for your dog. Here's a comparison of popular options:
- Cedar: Naturally resistant to decay, insects, and moisture, cedar offers excellent durability. Its aromatic scent also acts as a natural insect repellent. However, cedar can be more expensive than other options.
- Pine: A readily available and affordable softwood, pine is easy to work with and readily accepts paint or stain. However, it is more susceptible to rot and insect damage than harder woods.
- Pressure-Treated Pine: This option offers greater resistance to rot, decay, and insect infestation than standard pine, making it an excellent choice for outdoor structures. However, ensure the treated wood is free of harmful chemicals before your dog comes into contact with it.
- Redwood: Known for its natural resistance to moisture and decay, redwood is a durable and attractive option for dog house construction. However, it tends to be more expensive than other choices.
When choosing wood, ensure it is free of knots, cracks, and other imperfections that could weaken the structure. Consider using plywood for the floor and roof to create a more stable and moisture-resistant surface.
Designing a Safe and Comfortable Dog House
A well-designed dog house ensures your furry friend's comfort and safety. Consider the following factors when crafting your design:
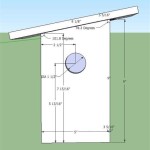
- Size: The dog house should be large enough for your dog to stand, turn around, and lie down comfortably. Aim for a minimum of 1.5 times the dog's length and 1.5 times its height.
- Entryway: The entrance should be large enough for your dog to enter and exit easily, ideally 8-10 inches tall and 2/3 the dog's height. Consider adding a flap or door to prevent drafts and keep your dog warm.
- Ventilation: Adequate ventilation is necessary to prevent moisture buildup and ensure proper air circulation. Include vents in the roof or walls to promote airflow.
- Roof: A sloping roof will effectively shed water and snow. Consider a roof overhang to provide additional protection from the elements.
- Flooring: Choose a waterproof and durable floor material, such as plywood or treated lumber. Avoid using materials that could be slippery or uncomfortable for your dog.
Essential Steps for Constructing a Wooden Dog House
Once you've chosen the appropriate wood and finalized your design, it's time to begin construction. Following these steps will help guide you through the process:
- Cut the Wood: Measure and cut the wood according to your chosen plans, ensuring precise cuts for a sturdy structure.
- Assemble the Walls and Roof: Join the walls and roof panels using screws or nails, ensuring secure connections. Consider using glue for added stability.
- Install the Floor: Secure the floor to the base of the dog house, ensuring it is level and provides a stable surface.
- Attach the Roof: Fix the roof to the walls, ensuring a secure and waterproof seal.
- Create the Entrance: Cut the opening for the door and attach a flap or door if desired.
- Add Finishing Touches: Sand the wood smooth, apply paint or stain to protect the wood and enhance the aesthetics, and consider adding a doormat for added comfort.
Before placing the dog house in your yard, ensure the ground is level and well-drained to prevent water damage. Consider adding a layer of gravel or mulch around the base for drainage and insulation.
Building a custom wooden dog house offers a rewarding experience, allowing you to create a comfortable and safe haven for your canine companion. Remember to prioritize safety and comfort when designing and constructing your dog house, ensuring it meets your pet's specific needs. With a little time and effort, you can craft an enduring shelter for your faithful friend, providing a cozy retreat for years to come.

Diy Dog Houses House Projects Homemade Pet Homes Easy Home Cool
:strip_icc()/IMG_2589-5a202f1c7d4be800191a3845.jpg?strip=all)
14 Free Diy Dog House Plans Anyone Can Build

Diy Modern Dog House Plans Outdoor Wooden Luxury Houses Bed Puppy Large Medium

Dog House Ideas The Home Depot

Churanty 47 2 Inch Large Wooden Pet Outdoor Dog House With Porch Kennel Cabin Style Indoor Crate Doors Com

Buy Diy Modern Dog House Plans Outdoor Wooden Luxury Houses Bed Puppy Large Medium In

Easy To Build Diy Outdoor Pet House For Cats Or Dogs
:strip_icc()/sunset-free-doghouse-plans-5829ef8f5f9b58d5b18b1c6e.jpg?strip=all)
14 Free Diy Dog House Plans Anyone Can Build

Diy Dog House Plans Double Kennel Large Outdoor Stuff

13 Diy Doghouse Plans And Ideas The House Of Wood

