Revit House Plan Tutorial: Essential Aspects for Beginners
Revit is a powerful architectural design software that empowers architects and designers to create detailed and comprehensive house plans. Whether you're a beginner or an experienced professional, understanding the essential aspects of Revit house plan tutorials can significantly enhance your workflow and produce high-quality deliverables.
1. Interface and Navigation
The Revit interface comprises a ribbon menu, toolbars, and a project browser. The ribbon houses tools arranged in logical tabs, while the toolbars provide quick access to frequently used commands. The project browser allows you to manage and organize project files, including views, sheets, and schedules.
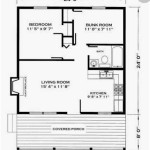
2. Creating Walls and Floors
Walls and floors form the foundation of any house plan. In Revit, you can create walls using the "Wall" tool, specifying their thickness, height, and materials. Floors are created using the "Floor" tool, allowing you to define their elevation, thickness, and finish.
3. Doors and Windows
Doors and windows are crucial elements for access and ventilation in a house plan. Revit provides a comprehensive library of doors and windows that you can insert into walls. You can customize their dimensions, styles, and materials to suit your design.
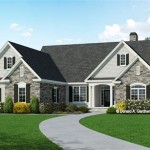
4. Roofs and Ceilings
The roof protects the building from the elements, while ceilings define the interior height of rooms. In Revit, you can create roofs using the "Roof" tool and choose from various roof styles, such as gable, hip, or shed. Ceilings are created using the "Ceiling" tool, allowing you to specify their height and finish.
5. Stairs
Stairs are essential for connecting different levels of a house. Revit provides tools for creating straight, curved, or spiral stairs. You can define their dimensions, materials, and handrails.
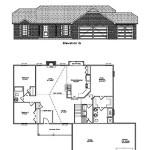
6. Views and Sheets
Views are virtual representations of the model that allow you to view the project from different perspectives. Revit offers various view types, including floor plans, sections, and elevations. Sheets are used to organize and present views in a logical order.
7. Dimensions and Annotations
Dimensions and annotations provide essential information on the house plan. Revit allows you to add dimensions to walls, floors, and other elements to specify their sizes. Annotations, such as text notes, tags, and symbols, can be added to clarify the design and convey additional information.
8. Schedules and Tags
Schedules are tabular lists that summarize information about the elements in the model, such as doors, windows, and rooms. Tags are annotations that automatically update to display the properties of individual elements, such as door numbers or room areas.
Conclusion
Revit house plan tutorials provide a comprehensive guide to creating detailed and accurate house plans using this powerful software. By mastering the essential aspects outlined above, you can unlock the full potential of Revit and produce high-quality architectural designs.

Revit Beginner Tutorial Floor Plan Part 1

Revit Beginner Tutorial Floor Plan Part 1

14 Beginner Tips To Create A Floor Plan In Revit Pure

Autodesk Revit Complete House Plan Tutorial Part 1

14 Beginner Tips To Create A Floor Plan In Revit Pure

14 Beginner Tips To Create A Floor Plan In Revit Design Ideas For The Built World

14 Beginner Tips To Create A Floor Plan In Revit Pure

Revit House Design 38x38 G 1 Tutorial 01 Complete In

Cool Revit Presentation Plans Architecture Home Design Free

Revit House Project Tutorial For Beginners 2d Plan And 3d Model News