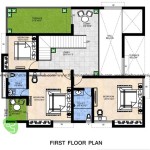
AutoCAD Floor Plan Tutorials: Design Your Dream Home
AutoCAD is a powerful computer-aided design (CAD) software used by architects, engineers, and designers to create precise and detailed drawings. With AutoCAD, you can easily create floor plans for your dream home, ensuring accuracy and efficiency in your design process. Whether you are a professional architect or a DIY enthusiast, AutoCAD floor plan tutorials can guide you through the steps of creating professional-looking floor plans. These tutorials provide step-by-step instructions, detailed explanations, and helpful tips to help you master the AutoCAD software and create stunning floor plans. ## Getting Started with AutoCAD Floor Plan Tutorials Before you dive into the tutorials, ensure you have the necessary software and resources: *AutoCAD Software:
Download and install the latest version of AutoCAD software on your computer. You can purchase the software or use the free trial version. *Computer with Sufficient Specifications:
Make sure your computer meets the minimum system requirements for running AutoCAD smoothly. *Tutorial Materials:
Gather any tutorial materials, such as images, reference guides, and sample floor plans, that may be required during the tutorials. *Basic CAD Knowledge:
It's helpful to have a basic understanding of CAD concepts and terminology before starting the tutorials. You can find introductory tutorials online or consider taking a beginner's CAD course. ## Step-by-Step AutoCAD Floor Plan Tutorial Follow these steps to create a floor plan using AutoCAD: 1.Create a New Drawing File:
Open AutoCAD and start a new drawing file. Select the appropriate template for a floor plan or use a blank template. 2.Set Up the Drawing Units:
Choose the appropriate units of measurement for your floor plan. AutoCAD supports various units such as inches, feet, meters, and centimeters. 3.Draw the Exterior Walls:
Start by drawing the exterior walls of your floor plan. Use the "Line" command to draw straight walls and the "Arc" command for curved walls. 4.Add Interior Walls:
Divide the floor plan into rooms by adding interior walls. Use the same commands as for exterior walls, ensuring that the walls intersect correctly. 5.Insert Doors and Windows:
Use the "Door" and "Window" commands to insert doors and windows into the walls. Select the appropriate styles and sizes from the AutoCAD library. 6.Add Room Labels:
Label each room in the floor plan using the "Text" command. Choose a suitable font and size for the labels. 7.Add Dimensions:
Add dimensions to the floor plan to indicate the length and width of walls, room sizes, and other important measurements. Use the "Dimension" command to create linear, angular, and radial dimensions. 8.Insert Furniture and Fixtures:
Use the "Insert" command to insert furniture and fixture symbols from the AutoCAD library or import custom symbols. Position and scale the symbols appropriately. 9.Add Annotations:
Use the "Leader" and "Note" commands to add annotations to the floor plan, such as notes, comments, and labels. These annotations help clarify the design intent and provide additional information. 10.Create a Title Block:
Add a title block to the floor plan, including project information, such as the project name, address, scale, and drawing number. Use the "Title Block" command or create your custom title block. 11.Save and Export the Floor Plan:
Save the floor plan as a DWG file, the native AutoCAD file format. You can also export the floor plan to other formats, such as PDF, JPEG, or PNG, for sharing and printing purposes. ## Advanced AutoCAD Floor Plan Tutorials Once you have mastered the basics, explore advanced AutoCAD floor plan tutorials to learn more complex techniques, such as: * Creating multi-story floor plans with elevation views * Working with layers to organize different elements of the floor plan * Using dynamic blocks to create parametric symbols * Adding materials and textures to create realistic renderings * Creating 3D floor plans for virtual tours and presentations ## Conclusion AutoCAD floor plan tutorials are an invaluable resource for anyone looking to design and create professional-looking floor plans. Whether you are a professional architect or a DIY enthusiast, these tutorials provide a step-by-step guide to help you master the AutoCAD software and create stunning floor plans for your dream home or project. With the knowledge gained from these tutorials, you can easily create accurate and detailed floor plans, ensuring that your design ideas are communicated effectively to builders and contractors.
Making A Simple Floor Plan In Autocad Part 1 Of 3

Basic Floor Plan Drafting In Autocad 7 Steps Instructables

Autocad Simple Floor Plan For Beginners 1 Of 5

How To Draw Floor Plans In Autocad Edrawmax

Autocad Floor Plan Tutorial For Beginners 4

How To Draw Floor Plans In Autocad Edrawmax

Autocad Tutorial Draw A House Floor Plan Free Cad Blocks In Dwg File Format

Autocad 2024 Tutorials For Beginners Floor Plan

Floorplan Complete Tutorial Autocad Learn

Layouts And Plotting In Autocad Tutorial S